
Welcome to my tutorial, my fellow learners. In this tutorial, I'll be showing you how you can create a simple snake game with just using Javascript, CSS and HTML. You can move the snake around. The snake could increase its size when it eats the food in the game. Although this is a straightforward version of the snake, so it won't have many features. You can't lose in this game as there's no system designed for it. You can move into the opposite side of the border, by moving through the perimeter of the canvas.
This tutorial will split into two blog post. The first one will explain the functions needed for the game. While the second one will tell you how to use all the functions together to make the game work. At the end of this tutorial, I'll be showing you the improvement that you could add to the project to make it more fun to play. You can get the code on GitHub here. If you want to test play the game, you can do it by clicking this link (Github Page)
 |
| Example of an in-game screenshot |
Prerequisite for this project:
- Basic HTML
- A little bit of CSS
- Knows Javascript quite a bit
Index for the tutorial:
- Project file structure
- Index.html (part 1)
- entity.js (part 1)
- interface.js (part 2)
- global variable initialisation
- startup functions for the game
- getting key pressed by the user
- updating the game using the game loop
Component needed for our game
So to make a snake game, we'll need quite a few components for it to work. The very first thing is for the game to load up when the web page is loaded. That's where we'll use the window.onload and load the game from there. Just in case you don't know what window.onload is, it's the event fired when the window is loaded. we can then use a function to handle the event.Then, after the game is loaded, we'll need to draw out all of our objects onto the screen.
Another important component in this game is the game loop, where we repeatedly call a function on a specific time interval. This let our game to have movement and changes on the game's object (the snake and food position for instance). Another thing that our game needs are to be able to check if the snake has eaten food in each game cycle. Because we need to be able to increase the length of the snake after it eats food.
Finally, since this game is controlled by the keyboard, we will need a way to detect key pressed by the user using an event listener. That's pretty much all the component needed to make a simple snake game. Let's get started with the class that's needed by our project.
File structure for our project
We'll be using three files for our project:
- Index.html – for displaying element onto the web page
- entity.js – to store the class for our snake and food
- interface.js – all user interaction with the game would be controlled and monitored using the functions in this file.
I'll be using Visual Studio Code as my IDE, but you can use any IDE of your choice. Another thing is that remember to link those Javascript files with the HTML file using the <script>…</script> tag or you'll keep wondering why you always get an empty browser.
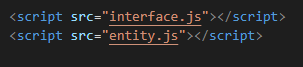 |
| Linking Javascript file with the HTML file |
index.html
Creating canvas
Now that you know the structure of our project, let's get started with our index.html file. In this file, we'll just put a canvas tag as well as the basic HTML structure.
 |
| Basic HTML structure with a canvas element in it |
We'll be giving the canvas size of 600x600 pixel. You can provide the canvas with any size that you want but just make sure you can divide the number with 20 and with no remainder. The reason for the numbers being able to divide with 20 is because each tile (box) in the game has the width and height of 20. We need some ways to know the total rows and columns that we have for the mechanism of the game later on.
Don't forget to give the canvas an id (in my case I gave it "canvas"). Now try running the file in the browser, and you'll get an empty web browser. Now, if you're using Visual studio code, there's an extension called "open in browser" which let us open the current HTML file in a browser, which is quite convenient for web developers.
Styling the canvas with CSS
Now that we have our canvas in place, time to put up some style for it. I added the CSS internally as we only need to add style for our canvas.
 |
| CSS code for the canvas |
In my case, I adjusted the canvas so that we can align it to the centre of the browser. We can do this by changing the position of the canvas to absolute. As well as changing the starting position of the canvas to starts at 50% height and 50% width of its parent element, the <body> tag using "top" and "left". Another thing to add to make the canvas at the very centre of the screen is to translate its current position using "transform: translate(-50%, -50%);".
The reason for us to do this is that when drawing a canvas onto the browser, it'll starts at its left-most and top-most position of the canvas. Therefore, when we change our canvas's initial starting point to 50% of the screen width and height (starts at the centre of the screen). After drawing our the whole canvas with its height and width, it won't be at the centre anymore (starting point + width or height). That's why we need to decrease the starting point of the canvas element by half of its height and width.
 |
| Giving the width and height of 600px (inline HTML attributes) |
 |
| Positioning the canvas 50% of the height and width of the document |
| Transitioning the canvas to half of its own size |
 |
| The final position of the canvas |
The entity.js
 |
| Two important class of our game, along with a const variable to store movement key code |
This file store two of our essential classes called snake and food, which provide us with the core functionality of our game. The constant array "directionKey" stores the keycode for the key pressed on the user's keyboard. They're arranged in the order; left, up, right and down.
The snake class
constructor()
We'll be using this snake class to store our snake's head's position, the tails node position, length of the snake and the current direction of the snake.
 |
| Snake class's constructor |
The class also contain some methods to help us manage the game. The methods are:
- Constructor() – to initialise the needed variable.
- Draw() – to draw the snake onto the canvas.
- Update() – to update the position of the snake according to its current direction. As well as relocate the tails node position accordingly.
- Eat() – used to check whether the food is on the head of the snake
- changeDirection() – used to change the direction of the snake.
Draw () method
Since we'll be using the constructor for the variable initialisation, we'll be skipping its explanation (there's some explanation in the code comments).
Now for our draw() function, we first set the style for filing the canvas element to yellow using (ctx.fillStyle = "#f2f23f"). Then we'll need a for loop to loop through the tail array and draw the tail nodes according to their coordinate.
As we are drawing the snake using fillReact, we need to give it a width and a height. If you still remember in the section above, I mentioned that each canvas tile has a width and height of 20. Therefore, we can use the variable "box" to assign the value. After drawing the snake's tail, the browser would draw the snake's head onto the canvas.
 |
| draw() method of the snake class |
Update() method
We'll be calling this method every time the game loop cycled (explained in the interface.js section). The function of this method is to update the coordinates of the snake's head and tail. We can do this by using a for loop to iterate through the tail nodes. Then, change the current tail node's coordinate with the node's coordinate after it. You can imagine the first node in the array is the last tail node and the last array element as the first tail node near the head of the snake. When changing the nodes coordinate, we'll exclude the last node (near the head) as it'll take the coordinates of the head.
 |
| Snake movement explanation (when not on a food node) |
Then, we'll add the current head position of the snake with xSpeed and ySpeed times the box (as one step in the game is the size of 20 x 20).
 |
| update() method of the snake class |
Eat() method
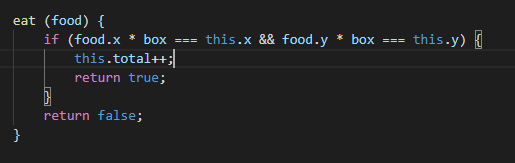 | |
|
We'll be using this method to check whether the snake's head is on top of the food coordinate. If the result is true, then the total length of the snake will be increased and return true. If the result is false return false from the function. In the update() method earlier, I said that the last tail node of the snake would take the position of the snake's head. But, when we increased the snake's "total" variable value, two of the tail node will have the same position in the tail array. That is because we specify the last node of the tail by the number stored in the total variable.
Therefore, when we increase the "total" variable number, a new node will be added into the array, and it'll have the current head position. Then the second last tail node will remain its position as the third last node of the tail (the third last node get its position from the node after it). But the issue will be resolved once one of the repeated position nodes gets replaced with another node's location. See the image below for easier understanding.
 |
| Snake node's coordinate movement when food is eaten |
changeDirection() method
Now for the last method in our snake class is the changeDirection() method. This method let us change the xSpeed and ySpeed.
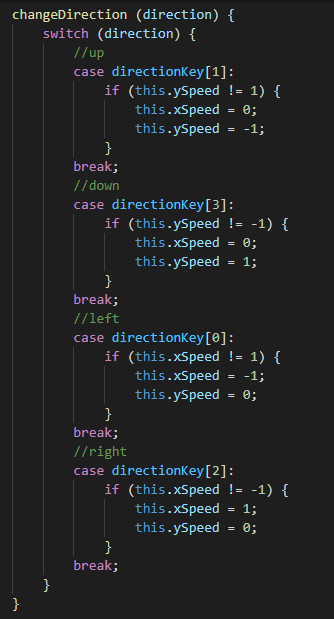 |
| changeDirection() method of the snake class |
According to the keyboard key pressed (up, down, left and right). When changing the direction, we'll also need to check if it's the opposite direction of the current snake's direction. Because well when the snake is moving to the right, it's not logical for it to just able to go to the left when it hasn't turned its head to up or down first then turn to the right side of the game. See the below image on how the direction works. I saved the key code into a constant array so that you can change it to others key code anytime you want.
 |
| Rules for the snake's movement |
Just in case you don't understand why are we using these numbers I'll explain it to you. Since a box in HTML is drawn from the top-left part of the element to the bottom right. So, if you use a graph grid system view, for a point to move to the right, it'll need to increase its x value right? Therefore, the movement of our game will be like the graph grid system. This also goes the same to the up and down key.
The Food class
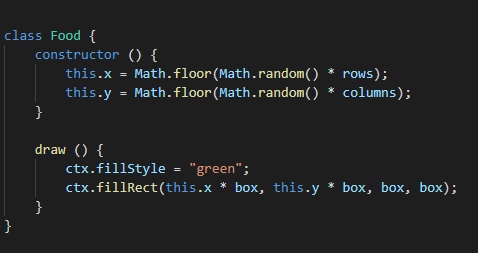 |
| The Food class |
Now, let's move on to the second class, the Food class. This class consists of two methods; a constructor and a draw method. The constructor specifies the coordinate for the food object when we create a new Food object. While the draw() method is used to draw the food onto our canvas, coloured in green. Also, remember that you need to include the width and height of the box tile (20x 20).
In specifying the coordinate for a newly created Food object, we'll be creating the coordinate randomly using the Math.random() method. The random number will need to times the rows or columns as the random number provided by random() is between 0.0 – 1.0 (excluding 1). So we need to times it with our rows or columns. Rows are used as the x coordinate limitation while we'll be using columns for the y coordinate limitation of the food.
That's it for this part for the project, you can read on the second part here. I hope you now know what component do we need to make a simple snake game. As always, if you found this tutorial helpful, please share it with other people that might need it or are interested in it. If you have any questions, suggestions or critics, feel free to comment at the comment section below. In the next tutorial, I'll be explaining how do you make these classes and methods to work together to create a playable game. So stay tuned.
No comments:
Post a Comment