
Welcome to another tutorial on my "How To Code In Java" tutorial series. In the last tutorial, I explained about what variable is. In this tutorial, you'll be learning about the different ways in printing output in Java. You'll also learn when to use them and how to utilise them. Now, let's begin.
I know this sounds obvious, but the reason why there're different ways to output a value in a programming language is so that programmers could use them during different situations.
Some common ways to print output:
System.out.println()
This method is used to print out a text to the console and adding a new line at the end of our output. The next output printing cursor will start at a new line.
|
No |
Type of println() |
Description |
|
1 |
void println() |
Print out a line separator and terminates the current line. |
|
2 |
void println(boolean a) |
Print out a booleans value and terminates the current line. |
|
3 |
void println(char a)
|
Prints a character value out and terminates the current line. |
|
4
|
void println(char[a]) |
Prints an array of characters in sequence and terminates the current line. |
|
5 |
void println(double a) |
Print out a double value then end the current line. |
|
6 |
void println(float a) |
Prints a floating number onto the console and terminating the current line. |
|
7 |
void println(int a) |
Prints an integer value out and terminating the current line. |
|
8 |
void println(long a) |
Prints a double value out and terminates the current line. |
|
9 |
void println(Object a) |
Print out an object and terminates the current value. |
|
10 |
void println(String a) |
prints a string to the console and terminating the current line. |
 |
| Some usage example of println |
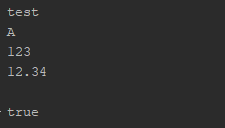 |
| The output of the code above |
System.out.print()
This type of output printing is somewhat the same as println just that it doesn't terminate the current line (add a new line to the end of the output) and it cannot be used without any arguments. If you didn't apply any arguments for it, then a syntax error will be produced. You can use this method when your next output after the current one will need to be in the same line.
 |
| As I mentioned, print() cannot be used without an argument. |
 |
| Code example for some valid usage of print() method |
| As you can see all the output is combined |
The output for the example above is combined together because there's no line termination used in the output.
System.out.printf()
Now for the last common method for printing output in Java is the printf() method. This method lets us print our output in a formatted way. When using the printf() method, you need to provide it with at least one arguments(just like print()). You can use this method to print out an output with a line break. This method is really convenient in many ways, it's much more flexible than the other two methods. Imagine it, we can format the text the way we want nicely and then we can just add the values according to the format specifiers position.
 |
| As you can see, you need to use at least one arguments with printf() |
This method used format specifiers and literals(exactly the text that we want to output). Format specifiers, when used with printf(), means the data type that we want to use during the output of the value. Note that you can use multiple format specifiers in one statement. But you need to remember to place the values or variables (using values from a variable) according to the correct specifier or the output won't be the one you want. Some commonly used format specifiers are:
- %s - format for string
- %d - format for decimal integers
- %f - format for floating numbers
- %t - format for date/time
- %n - output a newline (terminate current line)
As a general view of how to use the printf() method, you can see this below statement,
System.out.printf(format specifier, variable or value to be inserted into the string);
Note, that the format specifier is in a double quote, this means that we can use string alongside the format specifier. Here's some code example:
Using "%d" to print numbers in a formatted way
 |
| Example of using format specifier %d in printf() |
 |
| Code output |
Now, let me explain the output. In the first one, the printf() method is provided with a format specifier "%d%n", where "%d" is used to prints number, and "%n" is used to terminate the current line (move the terminal cursor to the next line).
After that, in the second printf() statement, the same format specifier is used, but they are added with some number in between the "%d" format specifier. This tells Java how many widths should the data be printed out. In our case, "08" means that we want the compiler to print out this value with the width of 8 characters and the padding of the number will need to be filled with 0. Padding means the space that is replaced with a specific character when some character space is unoccupied.
In the third statement, the printf() method is provided with "%-,8d%". The comma symbol makes the number which has exceeded 1000, to have a comma (,) after the third character of the last comma position. Compared to the last statement, this statement doesn't have a 0 in front of the width of the specifier. When we didn't specify which value to be used for padding, Java would fill the remaining unoccupied space with blank padding.
Since, in this statement, I also used the "-" symbol alongside the specifier. The minus symbol here means that if there's blank padding exists when outputting the number, the number will be left-justified. If a zero is provided in front of the comma, the remaining width space will be filled with 0 as stated earlier.
In the fourth example, the example is the same as the third one. The difference is that there's no "-" symbol this time. You'll notice that the number is right-justified. All value in printf() by default is right-justified.
Using "%f" to format how to print out floating numbers


In the first statement, the printf() is provided with the format specifier "%f%n". This format specifier will specify that the value will be printed as a floating number. The "%n" symbol has been explained in the above section, you can read it back if you forgot what it is used.
In the second statement, the format specifier used is about the same, just that an additional ".3" number is used in front of "%f". This lets Java knows that we want to print a floating number with specific precision (precision means the number of digits to be printed after the decimal point)
Lastly, in the third statement, the format specifier is provided with a width of 10. This time I didn't use "-" symbol, the numbers are right-justified (as of default). Then, as there's no specific character is used for the padding character, blank space will be used by Java for the padding.
Using "%t" to format time/dates output
To use the "%t" format specifier, you need to first pass a Calander class object into the value. Calendar class object in brief explanation is used for accessing the user's computer time and date.
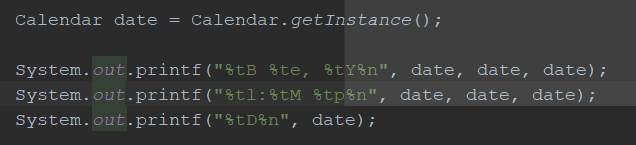 |
| Example for using printf() with "%t" to output dates or time data |
 |
| Code output |
Now, for our last example code section, you'll notice the variable is used multiple times. This is because when using a variable to provide value to a format specifier, the position of its placement will be according to its position after the format specifier. This also means that if you want to re-output the same value but with the different format specifier, you need to re-provide the variable for them.
Here's what each format specifier do:
- %tB - output the month name in two digits
- %te - output the day of the month in two digits
- %tY - output a four-digit year number
- %tl - output the Calander object's hour value in 12-hour format and two digits
- %tM - getting the Calander object's minutes
- %tp - outputting the am/pm indicator, use %Tp to get them in capital letter.
- %tD - output the object's date value
Finally, that's all for this tutorial. I hope you now know how to print out outputs using different methods depending on your situation. If you have any question regarding this tutorial, feel free to leave a comment below. Also, don't forget to share this tutorial with others if you find it helpful. For the next tutorial, you'll be learning how to do math in Java.
No comments:
Post a Comment