
Welcome to the third tutorial on the "How to Code in Java" tutorial
series. Previously, we learned the advantages and disadvantages of Java. In this tutorial, I'll be showing you how to set up Java on a Window
machine. I'll also guide you through how to set up Netbeans, an IDE for Java.
The structure of tutorial for this series is in this post, check it out if
you're interested in reading the rest of the series. If you're interested in
what is an IDE and why you probably need one, you can read it on my other post
here. Now, let's begin.
Index for this tutorial:
Installing Java in a Window computer.

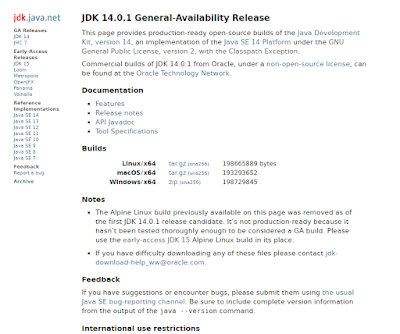
The first thing to do is to navigate to Java's JDK download page. Now, press the latest version of Java, in my case
Java 14. Then in the builds section, choose "Windows / x64", and a zip file
will start to download. The zip file contains the Java JDK.

Once the download is complete, create a new folder in "C:\Program
Files". You can name the folder whatever name you want, but remember the name
you gave it. Then, extract the content of the zip file into the folder. That's all you need to download Java onto a Window machine. Now, you'll need to install an IDE to help
you develop a Java program easier. Any IDE that supports Java would do the trick. I choose Netbeans for our tutorial is because it's more beginner-friendly to use.

Installing Netbeans for Java

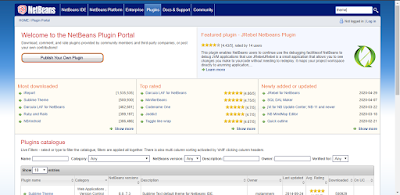
Netbeans is one of the popular IDE for Java programmers, other IDEs like as Eclipse and IntelliJ IDEA are also popular among programmers. Now to download Netbeans IDE, first go to the Netbeans website
and search for the latest stable version. In my case, the newest version is
Netbeans 11.3.

After you found the latest version, download the Netbeans Window installer listed at the page after the download is finished, run the installer. Left the first section as it is, but if you don't want Netbeans to support other features like supports for PHP programming language, you can remove them by unchecking them in the checkbox in the customize section.


After you found the latest version, download the Netbeans Window installer listed at the page after the download is finished, run the installer. Left the first section as it is, but if you don't want Netbeans to support other features like supports for PHP programming language, you can remove them by unchecking them in the checkbox in the customize section.

Next, you'll reach the Netbeans license agreement, and please read it to
get a brief idea of it. Then, after agreeing with the license, click next and
you'll see two filled input field where the first one is the location to
download Netbeans to and the second one is the location of our Java "bin"
folder.


By default, Netbeans will help us to find the folder location, so you
don't need to worry about it. But if you want to change the download location,
you can specify it in the first text box. Then, click Next, and in this
section, you can recheck the location of the Netbeans installation, whether you
want it to automatically checks for updates and the total size of the
installation. Then click install after you confirm with the installation.


When the installation is finished, open up Netbeans and navigate to its
plugins menu by going through "Tools > Plugins" at the tools bar. Make sure "Java SE" and "Tools" is activated, if it is not activated, activate it by ticking its
checkbox and press the activate button. Java SE includes all the tools that are
required to create and run a Java program that's why we need to activate it
before we can create anything in Java. After the activation, Netbeans should ask you whether you want to restart Netbeans now or restart it later. You'll need to select restart now because every time we add or modify plugins, we need to restart Netbeans for the change to take place.


How to make Netbeans feel great with plugins.
Now, the default design of Netbeans is a bit plain and boring. Most of
the programmers like dark theme when they code. This is due to the
concentration humans need when reading dark text in a light background. But
this is also based on one's personal preferences. So, if you're okay with
Netbeans default themes, you can skip this part.

Now, to add a theme to Netbeans, you need to go to their website plugins page. On the top right corner of the page, there's a search bar for us to
search for plugins. Type in "theme" to search for all theme available for
Netbeans. There're many themes to choose from, but I personally like Dracula.
Not so dark and not so bright. You'll notice that we're downloading plugins
that are for an older version of Netbeans but don't worry the plugin will still
work.


After you found your desired theme, download it and then open up
Netbeans. Then, navigate to the plugin's menu again. A menu will pop
up later, now go to the "Downloaded" section and click the "Add Plugins" button. A file
window will show up after that and now navigate to the location where you
downloaded the theme file. Once you opened the file, the plugin will appear on
the plugins list. Select the plugin and press the "Install" button.


For the first section, click next, and for the next one, you'll be shown
the license of the plugin, please read it so that you have a brief
understanding of it. Then, if you agree with the license click install, you'll
notice the installation will start right away. In mid-way, a menu will pop up
for certification verification, here press continue and when the installation
is complete choose the "Restart IDE now" option and click finish. The IDE will
then restart itself and voila a beautifully themed IDE.


That's all for this tutorial, thanks for reading. I hope you now know how to set up Java and Netbeans IDE to help you to program in Java. If you find this tutorial
helpful, remember to share it with your friend that might find it helpful or
are interested in reading it. On the next tutorial, it's time to have some hands-on
on Java. In the following tutorial, you'll write your very first Java program. I'll
explain everything in simple term so that you could understand what the program
is doing so stay tuned.
No comments:
Post a Comment