
Welcome to another tutorial on the "How to code in Java" tutorial series. In the previous tutorial, I explained how we can take the user's input from the terminal using the Scanner class. While in this tutorial, we'll be going through on how loops work in Java. There're many different types of loops in programming, the commons one are for loop, while loop, do-while loop and enhanced for loop (Java only has this four types of loops). This tutorial won't be covering the enhanced for-loop of Java because it requires some knowledge of arrays to be understandable.
Index for the tutorial:
In programming, loops are used to repeatedly run a block of code for a defined number of times. Let's say you want to print out a text for multiple times when particular condition meets. You could also make a program to prints out a message repeatedly when the player gets a 6 on a dice roll. Loops are also commonly used with arrays to access the values stored inside the arrays. Arrays will be explained in the next tutorial. We won't be touching them in this tutorial, so don't worry about it.
 |
| Photo by Tine Ivanič on Unsplash |
while-loop
While-loop is used to execute a block of code as long as the condition is met. If the condition is always true (condition are met), the loop will run infinitely and at some point during the execution caused the program to crash because of out of memory exception being thrown. There's two commonly used type of loops: sentinel-controlled and counter-controlled loop.
In a sentinel-controlled loop, the number of loops is indefinite as we don't know how many times the loop will repeat. In this type of loop, the current loop will determine whether the system needs to execute the loop again. The system will know when to stop after the execution of the loop. While in a counter-controlled loop, the system already knows how many loops to perform even before the loop execution. The execution of the loop will stop when the counter reached a specific value.
In every loop, there will be a variable that acts as the control variable. In a sentinel-controlled loop, the control variable is called the sentinel variable. While in a counter-controlled loop, the variable is called counter. The syntax for a simple while loop is:
while (condition) {
//code to be executed when the condition is true
}
Now, let's make a simple loop using a counter-controlled loop.
 |
| A simple counter-controlled while-loop. |
 |
| Result for the while loop. |
As you can see, the loop will be executed exactly 5 times, as the counter starts at 0 and since the condition is the counter need to be less than 5 for the loop to be executed. The counter value is increased by incrementing the "counter" variable value.
The while loop above work like this:
- Initialise a variable called counter and assign it with a value of 0.
- The system will checks whether the counter variable value is still less than 5.
- If yes (true), execute the code inside the block.
- Print out "Counter now is: " along with the value of the counter value.
- Go back to step 2.
- If the checks failed (false), continue with the execution of code after the loop block.
- In our case, there's no more code after the loop. Therefore the system will "End" the program.
Next, let's make a sentinel-controlled loop to see its difference.
 | |
|
 | |
|
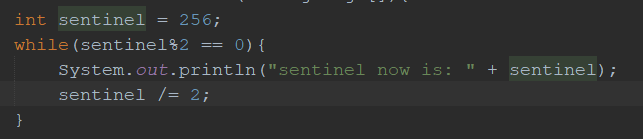
The code will print out the sentinel value and also divide the sentinel value with 2 in each loop execution. If the value before the division is an even number.
The code works like this:
- Initialise the sentinel variable and assign it with the value of 512 (512 number power of 2).
- The system will checks if the sentinel value is an even number.
- If the sentinel value is an even number, execute the code inside the loop code block.
- System print out the value of the sentinel
- The sentinel value is divided with 2, and the result is re-assigned back into the sentinel variable. (if you don't understand what I'm doing there, please read this tutorial)
- Go back to step 2
- If the sentinel value is not an even number, the system will exit the loop code block and continue with the execution of the next code statement.
- Since there's no code after the loop block, the system will "End" the program.
Do-while loop
do {//code to be run once even if the condition is not met}while (condition);
 |
| A simple do-while loop example. As you can see in the result, it'll run once even if the condition is not met. |
 |
| The result for the do-while loop code. |
For-loop
Now lastly, our final type of loop for the day is the for-loop. This loop is to be said a more structured way to write a loop statement. It's easier to detect and fix problems that are related to loops when we use a for-loop. That's because every information for the loop is defined in a single line. The loop will need three arguments when declaring the loop. The initialisation variable (the control variable), the loop's condition, and the operation performed onto the control variable after each loop execution. The arguments are separated using a semicolon. The syntax for a for loop is as below:
for (control_variable ; condition ; operation_after_one_iteration) {
//code to be executed
}
Now, let's create a simple program to simulate a simple dice roll. Where when the user runs the program, the program will print out the dice's number. When the dice number rolled is 6, the message "Yay, you got 6!!!" will be printed onto the terminal. While, if the rolled number is not 6, the program will just print out the message indicating what number the user got.
 |
| A simple dice roll simulation using a for-loop. |
 |
| Result for the simulation. |
The code works like this:
- Declare a for loop with a counter as a control variable and the condition for the loop to execute block's code. Which is that the counter value is less than 10. Then, the operation that will be performed onto the control variable after each loop iteration.
- If the condition is true or still true, continue with the code inside the block.
- Declare a variable called rolledNumber and assign it with a random number.
- The random number is generated using the Math.random() method (value from 0.0 -0.999...) and is multiplied with 6 (to get value from 0.0 to 5.99...)
- Since a dice roll is an integer, we'll need to round down the value generated just now.
- After rounding the number, we change the value to an integer by using typecasting.
- After we changed the value into an integer, we need to add the value with 1, to shift the minimum value generated to 1 while maximum to 6 (previously 0 to 5).
- Then the system will check if the value produced is 6 or not.
- If the value is 6, print "Yay, you got 6!!!"
- If the value is not 6, print "You got " along with the rolled number.
- Increase the counter value by 1 (increment) and go back to 2
- If the counter value is equal to or larger than 10, the system will exit the loop code block and continue with the execution of the next code statement.
- But since there's no more code after the loop block, the system will "End" the program.
No comments:
Post a Comment